Friday 27 May 2016

Creating First JMeter Script


In our previous and third post of JMeter, we have discussed about two main component required for creating a JMeter script. Follow the previous post first, if you are new to JMeter and have not seen that post.

So now I can hope that you have setup the JMeter on your machine to start with this session.

There are two default components you will see, when you will start the JMeter:

  1. Test Plan, and
  2. WorkBench

Test Plan describes the series of steps JMeter will execute when run whereas Work Bench is a temporary space provided to store test elements not in use, for copy/paste option or any other purposes you desire. While saving the test plan, workbench elements are not saved with it until you select the ‘Save Workbench’ option.

To start with creating your first JMeter script, follow the following steps:

  1. Add a ‘Thread Group’ to the ‘Test Plan’
  2. Now add ‘HTTP(S) Test Script Recorder’ to the ‘WorkBench’
  3. Set the browser and ‘HTTP(S) Test Script Recorder’ to one free port
  4. Also select the ‘Target Controller’ before starting the ‘HTTP(S) Test Script Recorder’
  5. Now perform the user actions and all the requests will be recorded under the selected target controller

See the following screenshot for better understanding:


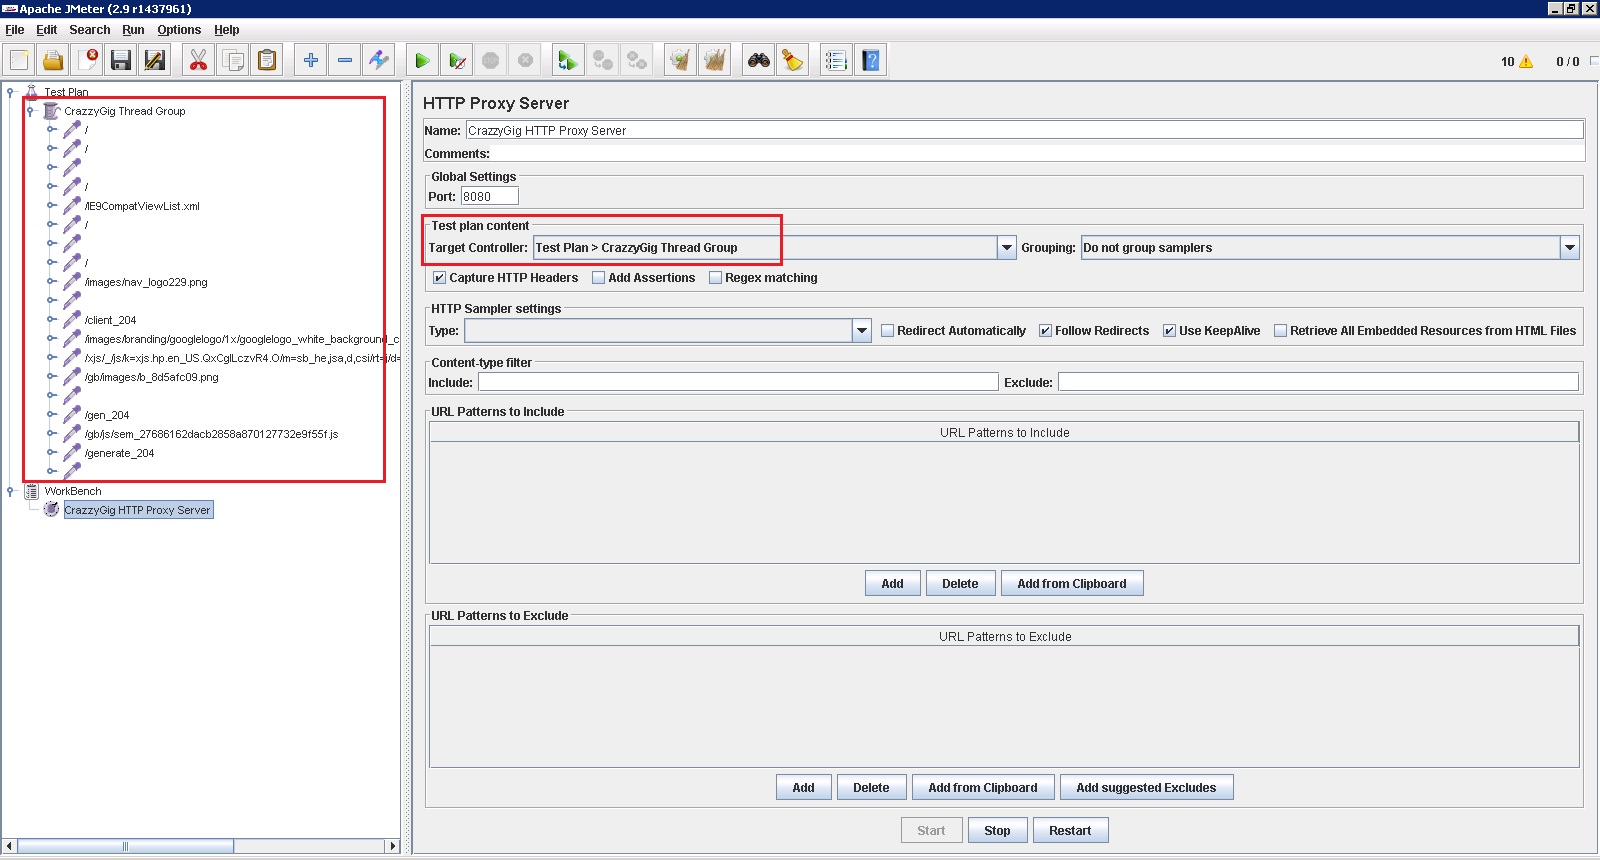
You can see that I have selected ‘CrazzyGig Thread Group’ in the ‘Target Controller’, so all the recorded requests will be saved under the ‘CrazzyGig Thread Group’. 

This is just the simple recording of the steps performed by the user, In next we see the script recording in more detail that way we can reuse the same scripts without any modification in scripts.

Please like and comment if you liked the post.  Stay tuned to see more posts.


Thursday 12 May 2016

Thread Group and HTTP(S) Test Script Recorder

In the next post we will see how to create JMeter Script, but I thought; it would be good to explain the ‘Thread Group’ and ‘HTTP(S) Test Script Recorder’ first. In order to create a script; you will need to add these two components. So, let’s begin with it.

Thread Group

Open JMeter, you will see the following screen:


Now, right click on ‘Test Plan’ and add a Thread Group.  Follow the flow to add the same: “Add >> Threads (Users) >> Thread Group”


Following are the components of the Thread Group:


  • Name: Name of the thread group, which user can set as desired.
  • Comments: Comments related to the thread group. Comments can help any new user to understand the work designed to perform by thread group.
  • Action to be taken after a sampler error: Option given under section will execute based on the user selection, in case any sampler error occurs.
          Continue - ignore the error and continue with the test
          Start Next Loop - ignore the error, start next loop and continue with the test
          Stop Thread - current thread exits
          Stop Test - the entire test is stopped at the end of any current samples.
          Stop Test Now - the entire test is stopped abruptly. Any current samplers are interrupted if                   possible.
  • Number of Threads (users): This parameter defines the number of virtual users you want to test on the application.
  • Ramp-up period (in seconds): This parameter defines the duration in which the user will be ramped up until the total numbers of VUs are up and running.
  • Loop Count: This parameter defines the number of iteration you need to run. There is a ‘Forever’ checkbox which can be ticked to run it infinitely.
  • Delay Thread creation until needed: If selected, threads are created only when the appropriate proportion of the ramp-up time has elapsed.
  • Scheduler: This parameter is used to enable the scheduler. It provide the start time, end time, total duration for which test should run and startup delay; which can be used to delay the startup defined in start time parameter.


HTTP(S) Test Script Recorder

HTTP(S) Test Script Recorder allows JMeter to intercept and record all your actions while you browse your web application on your browser. JMeter creates test sample objects and store them directly into selected target controller.

To add the HTTP(S) Test Script Recorder follow the steps mentioned below:

Add the http(s) recorder into workbench. Do right click on workbench and add ‘HTTP(S) Test Script Recorder’. Follow the flow, Add >> Not-Test Element >> HTTP(S) Test Script Recorder


After adding the HTTP(S) recorder:


There are few important attributes of HTTP(S) recorder, which a user should know about before creating the performance script. Following are the mandatory attributes which will be required to set before recording:

Under ‘Global Settings’ one can see the ‘port’ attribute. Actually recorder is implemented as HTTP(S) proxy server. You need to set up your browser and tool on the same port. 8080 is the default port, you can change it.

Under ‘Test plan content’, there is an attribute called ‘Target Controller’. It defines the controller where the recorder will place the generated samples.

Now we are good to start recording, leave other attributes as it is. To start the recording, start the recorder by clicking the start button at the bottom.

You will see a certificate prompt like:


Click ok and start recording.

Stay tuned to see more updates on JMeter.